I'm always looking for my next good recipe. I got this recipe off of Annie's Eats, one of my go-to blogs for recipes and ideas. I'm really into spicy things lately--I'm loving anything with some spice and heat in it--though not too much spice because I am a little bit of a wimp. So this recipe sounded like a winner when I read it and saw pictures. And I'm happy to say that it's a keeper!
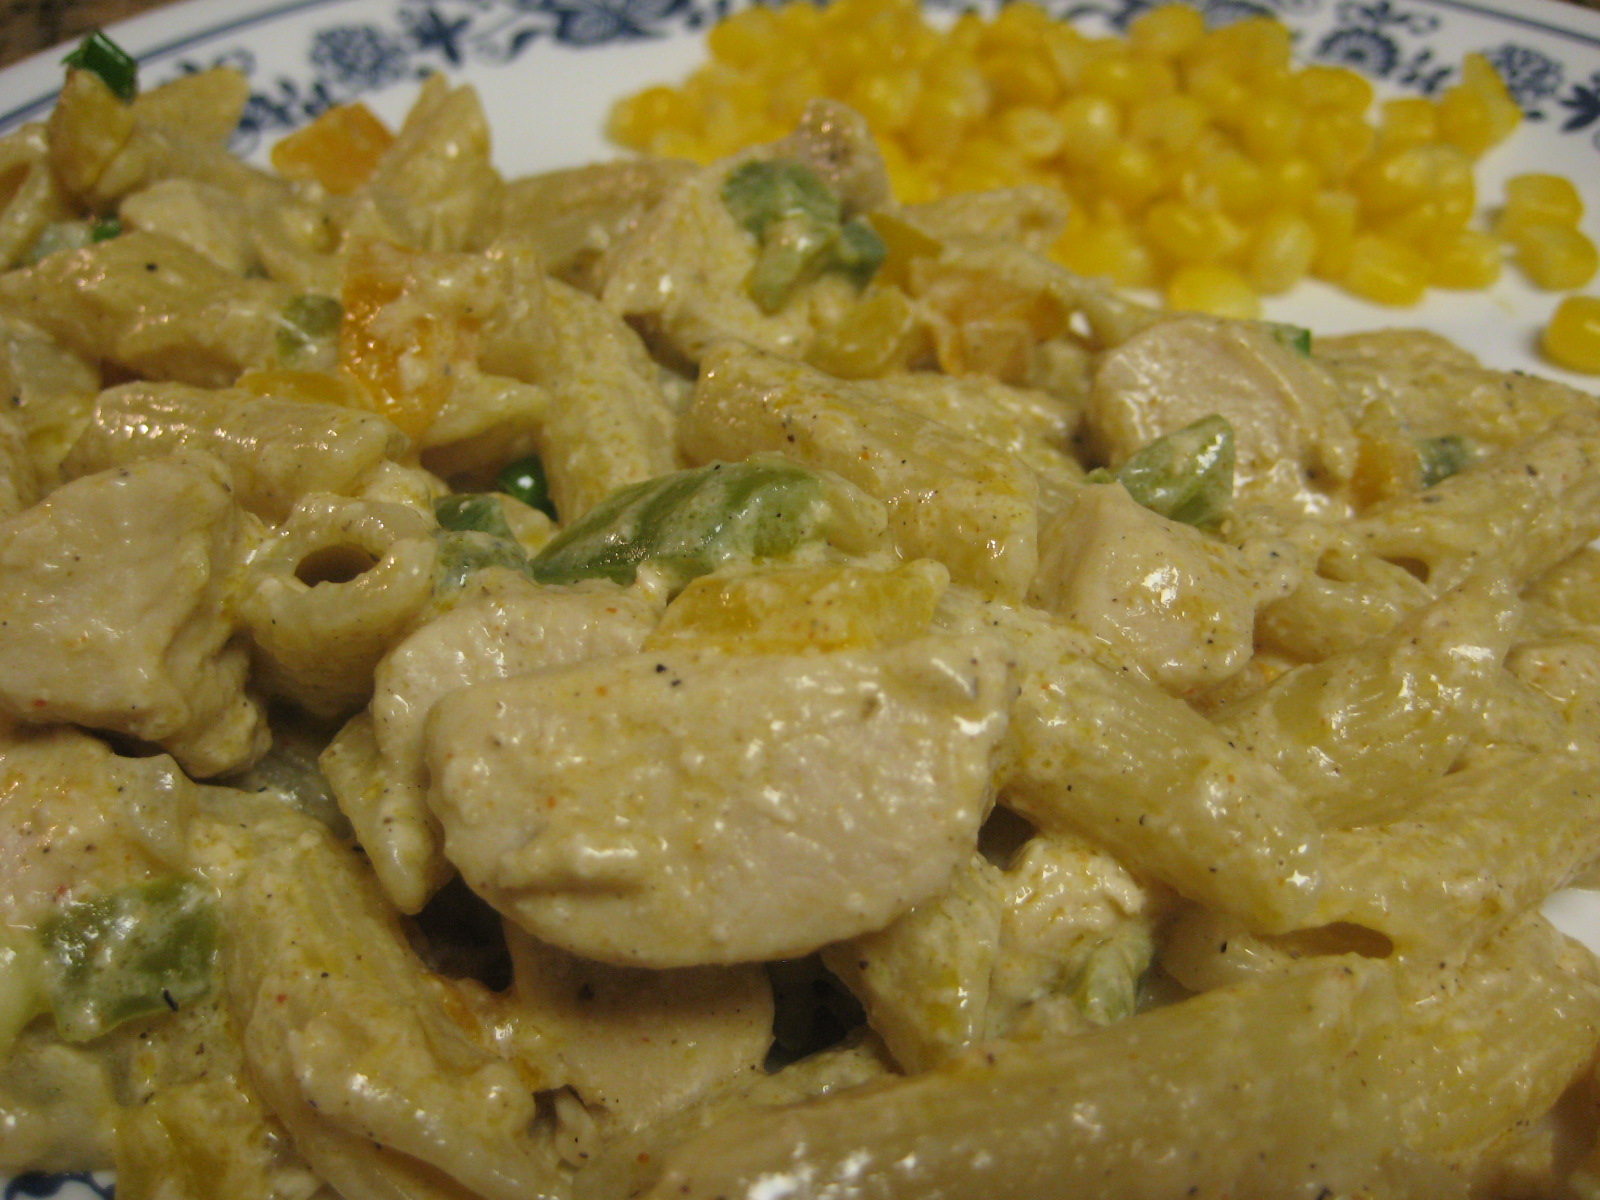
Louisiana Chicken Pasta
Source: adapted from Annie's Eats
Print Recipe Here
Ingredients:
For the Chicken:
1 pound large boneless, skinless chicken breast, cut into bite sized pieces
Salt and pepper
Cajun seasoning
For the Pasta:
16 ounces bowtie pasta (I used penne)
salt
For the Sauce:
1 tablespoon butter
1 tablespoon olive oil
1 red bell pepper, seeded and coarsely chopped
1 green bell pepper, seeded and coarsely chopped
1/4 cup yellow onion, chopped
3/4 teaspoon salt
black pepper, to taste
1/4 teaspoon garlic powder
1/2 teaspoon Cajun seasoning
1/4 teaspoon ground cayenne pepper
1 cup half and half
1/2 cup heavy cream
1 teaspoon cornstarch
1 tablespoon water
Directions:
To cook the chicken, heat a small amount of butter or olive oil and in a large skillet over medium-high heat. Season the chicken with salt and pepper, and a generous sprinkle of Cajun seasoning. Add to the skillet and cook until lightly browned and cooked through. Transfer to a plate and set aside.
Bring a pot of salted water to boil. Cook the pasta according to package directions. Drain the cooked pasta and set aside.
Meanwhile, return the skillet to medium heat and heat butter and olive oil until butter has melted. Add the bell peppers and onion to the pan. Mix in the salt, pepper, Cajun seasoning and cayenne pepper. Cook until the vegetables are tender, about 6-8 minutes. Add the half-and-half and heavy cream to the pan and bring to a simmer. In a small bowl, whisk together the cornstarch and water, and add to the skillet once the cream mixture has started to bubble. Allow to cook until thickened, about 5 minutes.
When the sauce has thickened, add the cooked pasta and chicken pieces to the pan. Stir well to combine and cook at medium-low heat just until the chicken is warmed through. Adjust the amount of Cajun seasoning if necessary to suit your taste. Top with additional Cajun seasoning if desired.
Amy's Notes:
I made this over two weeks ago. But now as I am writing this, I really want some again. This pasta is really good. It is spicy but not too spicy. It is great warm but could also be made ahead, chilled and served as a salad. You could also make it without the chicken for a pasta side dish. I will be making this recipe again soon!
Background
Showing posts with label side dish. Show all posts
Saturday, March 19, 2011
Sunday, March 6, 2011
BBQ Jalapeno Poppers
For Christmas, I got "The Pioneer Woman Cooks" cookbook, which is awesome and highly recommended. This is the first recipe in the book and I'd been trying to find a reason to make it ever since I saw it. The Super Bowl was my perfect reason (I know this post is a bit late!). These would be great party food and even can be prepared ahead of time!
BBQ Jalapeno Poppers
Source: The Pioneer Woman Cooks Cookbook
Print Recipe
Ingredients:
18 fresh jalapenos
1 8 ounce package cream cheese
1/2 cup grated cheddar cheese
1 green onion, chopped
18 slices thin bacon, cut into halves
bottled barbecue sauce
Toothpicks
Directions:
Preheat oven to 275 degrees. Begin by cutting jalapenos in half lenghwise (you might want to wear rubber/latex gloves while doing this or be prepared to to deal with a little burn later from the jalapenos). Try to keep the stems intact.
With a spoon, scrape out the seeds and light-colored membranes. Remember: the heat comes from the seeds and membranes, so if you can handle the sizzle, leave some of them intact.
Now, in a bowl, combine the cream cheese, cheddar cheese and chopped green onion. Mix the ingredients together gently.
Stuff each hallowed half with the cheese mixture.
Wrap bacon slices around each half, covering as much of the surface as you can. Be careful not to stretch the bacon too tightly around the jalapeno, as the bacon will contract as it cooks.
Brush the surface of the bacon with your favorite barbecue sauce.
Secure the jalapeno with toothpicks and pop them in the oven for 1 hour, or until the bacon is sizzling.
Serve hot or at room temperature.
Amy's Notes:
The Pioneer Woman says that these can be made a day ahead of time and kept in the fridge before cooking. Or they can even be cooked ahead of time and frozen, then reheated in the oven. A full batch of these makes A LOT! I made them for the Super Bowl where we had about 6 people and with all our other food, we had a lot of these left over. I would probably make a half batch next time. I used thick bacon when making this and it took much longer to bake because of that so I will use thinner bacon next time.
Friday, March 4, 2011
Broccoli Salad
The entire time I've known my husband, he's never like broccoli. Until about two months ago when he ordered steamed broccoli as a side at a restraunt. Since then, he says he likes broccoli and asked me to make this salad because he was 'craving' it. Ha! So, we made it together!
Broccoli Salad
Ingredients:
2 bunches broccoli
1 cup cheddar cheese, grated
1 cup red onion, chopped
1 pack bacon, cooked and crumbled
3/4-1 cup mayo (or Miracle Whip)
2/3 cup sugar
4 tablespoons (or more) vinegar
Directions:
Combine broccoli, cheese, onion, and bacon in bowl.
Mix mayo, sugar and vinegar in seperate bowl. Pour over broccoli mixture. Combine well and serve.
Amy's Notes:
This is one of those recipes that I ask my mom to make when I go home to visit my parents. I don't know why I don't make it more myself because it's not hard to make, just a little labor intensive because of all the chopping involved. It's also a salad that everyone has their own recipe--some people add raisins or sunflower seeeds with various ingredients as the dressing. But this is what I grew up with so it's the variation that I like the most!
Wednesday, December 22, 2010
A Chronicle of Moving Meals
Boy have I gotten behind on blogging. I guess that's what happens when you move though. As you might know, I had a personal challenge to use up as much as I could from my fridge and freezer before we moved. It's pretty hard actually, so I focused on using up anything with meat in it, veggies and any cupboard item that was going to expire in the next couple of months (or anything I could find to make that I didn't need to buy anything else to make a meal). Here's what I came up with:
Also in this time, we bought Papa Murphey's pizza one night and Subway sandwiches the last night before we moved. Most of what I ended up throwing away were odd and ends of things, like the leftover butter or half a package of frozen spinach, plus all the condiments. As for all the non-perishable items, I ended up buing a couple of smaller storage bins to keep them in for the move. I would say it was a successful food-use-up. Though I still did feel bad about throwing away what was left!
BBQ chicken, corn and a pasta dish from a box! |
Berry Cobbler, except I used up all the blackberries for some of them and then used blueberries in the rest. Both were delicious. Recipe: Here |
Blueberry Cobbler Minis |
Blackberry Cobbler Minis |
Chicken Nuggets and Waffle Fries: We bought these about 10 days before we moved which fed us for 2 meals. I ended up throwing a few of the chicken nuggets we didn't use away. |
Sloppy Joes! Some people are against them, I happen to like them, mostly because of the pickles and cheese! |
We used up the last pound of ground beef, and the rest of the pickles and cheese for this meal, although we did have to buy the buns. |
BBQ Chicken again (it's a staple in our family) used up the rest of the chicken on hand, cheesy veggies, and a southwestern corn/rice freezer dish. |
Cinnamon blueberry pancakes, used most of the blueberries, most of the pancake mix, and most of the syrup. The rest went in the garbage. |
I'm not usually a big pancake fan, but these were very good. |
Chicken Nuggets, waffle fries, and macaroni and cheese |
The state of our kitchen as I was making the above dinner. |
Yep, packing is not fun at all. |
Baked potatoes used up 2 or the 4 potatoes we had, cheese, sour cream and the last package of cheesy veggies. |
Tuesday, November 16, 2010
Gloppy Bread
Sorry for my lack of posting lately. I hadn't cooked much since being back from Florida until a few days ago. And I usually do my baking on my days off, since I don't have the energy on days when I work. Then our nephew was born and on my next few days off, we had to spend the weekend meeting him! So, still no baking. Hopefully that comes in the next few days. In the meantime, enjoy this adorable picture and the few other recipes I have to post in the next couple days.
Gloppy Bread
Printable Recipe Here
Ingredients:
1 loaf french bread
1 package Swiss cheese
1 small can of mushrooms, drained
3 tablespoons butter/margarine
1/2 teaspoon dry mustard
2 tablespoons poppy seeds
1 tablespoon lemon juice
1 tablespoon Johnny's seasoning salt (Lowry's or other seasoning salt works also)
Directions:
Cut french bread diagonally--first one way, then the other. Do not cut all the way through the bottom crust. Fill the slits going on way with Swiss cheese and the slits the other with mushrooms. Place in foil.
Melt the butter and add the mustard, poppy seeds, lemon juice and seasoning salt. Pour over the top on the bread.
Wrap with foil. Back 30 minutes at 350 degrees or until the cheese is melted.
Amy's Notes:
I love this bread. It's a staple at my parents house. Seeing as I don't make it across the county to my parents house very often these days, I decided it was time to make it myself. And I am glad I did. It was even better the next day. Be warned, check your teeth for poppy seeds after eating!
![]() |
(Source: Andy Rowe) |
Gloppy Bread
Printable Recipe Here
Ingredients:
1 loaf french bread
1 package Swiss cheese
1 small can of mushrooms, drained
3 tablespoons butter/margarine
1/2 teaspoon dry mustard
2 tablespoons poppy seeds
1 tablespoon lemon juice
1 tablespoon Johnny's seasoning salt (Lowry's or other seasoning salt works also)
Directions:
Cut french bread diagonally--first one way, then the other. Do not cut all the way through the bottom crust. Fill the slits going on way with Swiss cheese and the slits the other with mushrooms. Place in foil.
Melt the butter and add the mustard, poppy seeds, lemon juice and seasoning salt. Pour over the top on the bread.
Wrap with foil. Back 30 minutes at 350 degrees or until the cheese is melted.
Amy's Notes:
I love this bread. It's a staple at my parents house. Seeing as I don't make it across the county to my parents house very often these days, I decided it was time to make it myself. And I am glad I did. It was even better the next day. Be warned, check your teeth for poppy seeds after eating!
Cut bread diagonally one way... |
...and then the other way. |
Labels:
side dish
Friday, October 29, 2010
Happy Halloween!
I won't be posting anything the next week or so because we are going on an adventure in Florida! We are going to The Wizarding World of Harry Potter and are headed to the Kennedy Space Center to see the space shuttle launch (hopefully). But I wanted to wish everyone a Happy Halloween! Below are pictures of our pumpkins we carved this year, which was several weeks ago cause we were so excited to carve them. Mine is obviously the cupcake pumpkin! My husband carved a fish since he loves all things fishing. I also included the recipe for roasted pumpkin seeds that I used this year. Enjoy!
Roasted Pumpkin Seeds
2 cups cleaned, raw pumpkin seeds
2 tablespoons Worcestershire sauce
1 tablespoons butter, melted
1 teaspoon (or more) Johnny's seasoning salt
Preheat oven to 275 degrees.
Combine all ingredients and pumpkin seeds. Mix thoroughly and place on baking sheet. Bake for 50-60 minutes, stirring occasionally.
Monday, October 4, 2010
Bacon and Spinach Twice Baked Potatoes
The last time I had twice baked potates was years ago and my mom was probably the last person to make them for me. I love them but, for no good reason, had never made them before. When I am reading blogs and find good recipes, I either bookmark them or I print them if I think I am going them soon-ish. This was one I printed knowing I had spinach that needed using. Now, my husband is not one to be very excited about meals cooked with spinach (though he usually ends up liking them) but he saw these potatoes as I was preparing them and said they looked good. And they were!
Bacon and Spinach Twice Baked Potatoes
Source: Finding Joy in My Kitchen Blog
Printable Recipe Here
Ingredients:
6 large baking potatoes
salt
pepper
3 tablespoons butter
1/8 cup milk
2 cups fresh spinach
1/4 cup cooked bacon, crumbled
1 1/2 cup Colby jack cheese, shredded
Directions:
Wash potatoes and poke holes in the skin. Lightly salt the skins while the potatoes are still moist.
Place the potatoes on a cookie sheet and bake at 400 degrees for about 1 hour or until potatoes are tender when pricked with a fork.
Allow the potatoes to cool for 20-30 minutes or until they are cool enough to handle. Slice each potato in half lengthwise and allow them to cool for another 20 minutes.
Then, carefully scoop out the insides of each potato and place insides in large bowl and skins on baking sheet. Mash the potatoes in the bowl with the butter and milk, season with salt and pepper to taste. Add spinach, bacon and cheese. Stir until well mixed.
Carefully fill the potato shells on the cookie sheet. Return potatoes to oven and bake at 400 degrees for 20 minutes.
Amy's Notes:
The whole reason I made this recipe was because I had frozen spinach that needed to be used. The frozen worked just fine. I thawed it in the microwave, drained the water, and chopped it up before adding it to the potato mixture. Honestly, the spinach was not a very dominant flavor in these potatoes. They seemed more filling than other twice baked potatoes that I've had before, probably because of the spinach. I think I might try freezing half of them next time before I bake them the second time. I really liked these potatoes and will make them again.
Emptied out potato shells |
Ready for the second bake! |
Yum yum yum |
Labels:
side dish
Sunday, September 26, 2010
Black Bean and Corn Salsa
The year after my freshman year of college I did a volunteer program called Mission Year. For 11 months, I lived in West Philadelphia, spent four days a week volunteering in my community, attended the neighborhood church, invested in my neighbors, and lived intentionally with four other girls. It was one of the most challenging years of my life. And also the most life changing year of my life. Most of what I learned during that year would have been much easier to ignore--things about myself, poverty and racism, to name a few. But a nine year old talking about who in their class they want to have sex with, or a third grader who can't read words like 'cat' and 'dog', or discussions over lunch about who got shot down the street are hard to forget.
A major part of my year involved learning to invest in my teammates. My four teammates and I became very close during the year. Although I don't talk to all of them very often and only see them about once a year, I still consider them to be close friends. I experienced something with the four of them that most of the time I can't descibe to anyone else. I think part of why we became so close over the year, besides living in a very small house and all sharing one tiny bathroom, was that we ate dinner together six days a week. The five of us took turns cooking dinner once a week. And it was a huge challenge for me. I was 19 when I arrived in Philly. I had one year of college under my belt but never had to cook for myself before. Growing up, I usually had to cook dinner for my family once a week but that consisted of things like tuna helper, hot dogs or grilled cheese. Unfortunately, my cooking during Mission Year was not too different.
Thankfully, my teammates offered me a lot of grace while I stumbled through learning how to cook for five people. And they never complained about how many times I 'cooked' hot dogs for dinner. I learned a ton from seeing each of them cook throughout the year. I learned that cooking can be very stressful sometimes. That when you try new things, they don't always work out and that's just part of the learning process. That a meal doesn't have to be picture perfect. Much of what I know about cooking, I've learned from the people I've lived with from Mission Year and the years after.
At the end of our year together, we decided to put together a cookbook of the recipes we made during the year. I've used it quite a bit in the years since Mission Year. It's a lot of fun to look through since we wrote notes about each recipe which are funny to reread. I am very nostalgic about food. For instance, when I eat something it reminds me about when I first ate it or who I got the recipe from. When I make recipes from this cookbook I always think about those crazy months I spent in Philadelphia.
Below is one of the recipes from our 'Glitter Girls Cookbook'. We called ourselves the 'Glitter Girls' because the walls of our house were covered in glitter. The guy who did maintenance for our landlord covered the walls of the house in that horrible popcorn stuff that goes on ceilings and then threw glitter (like the silver glitter you used in elementary school for craft projects) up on the wall while the paint was drying. It was horrible and was just one of the many quirks of our house.
I hope to include several more recipes from this cookbook on this blog as well as some of my adventures in Philadelphia.
Black Bean and Corn Salsa
Source: Glitter Girls Cookbook
Printable Recipe Here
Ingredients:
1 can black beans
1 can corn
2 or 3 green, red or yellow peppers
1 small bunch green onions
1/2 white onion
2 or 3 tomatoes
1/2 bunch cilantro
1/4 cup lime juice
1 teaspoon cumin
1 teaspoon garlic
salt, to taste
Directions:
Empty beans and corn into a large bowl. Chop up peppers, green onions, white onion, tomatoes and cilantro. Add lime juice and spices. Let sit in fridge for a few hours for the flavors to mingle. Serve on chips or over lettuce as a salad.
Amy's Notes:
I love this stuff. I hadn't made it in almost two years so it was long overdue to make! We ate this salsa as dinner because it was so good! I've never done it but I would like to try adding avacado to this next time.
A major part of my year involved learning to invest in my teammates. My four teammates and I became very close during the year. Although I don't talk to all of them very often and only see them about once a year, I still consider them to be close friends. I experienced something with the four of them that most of the time I can't descibe to anyone else. I think part of why we became so close over the year, besides living in a very small house and all sharing one tiny bathroom, was that we ate dinner together six days a week. The five of us took turns cooking dinner once a week. And it was a huge challenge for me. I was 19 when I arrived in Philly. I had one year of college under my belt but never had to cook for myself before. Growing up, I usually had to cook dinner for my family once a week but that consisted of things like tuna helper, hot dogs or grilled cheese. Unfortunately, my cooking during Mission Year was not too different.
Thankfully, my teammates offered me a lot of grace while I stumbled through learning how to cook for five people. And they never complained about how many times I 'cooked' hot dogs for dinner. I learned a ton from seeing each of them cook throughout the year. I learned that cooking can be very stressful sometimes. That when you try new things, they don't always work out and that's just part of the learning process. That a meal doesn't have to be picture perfect. Much of what I know about cooking, I've learned from the people I've lived with from Mission Year and the years after.
At the end of our year together, we decided to put together a cookbook of the recipes we made during the year. I've used it quite a bit in the years since Mission Year. It's a lot of fun to look through since we wrote notes about each recipe which are funny to reread. I am very nostalgic about food. For instance, when I eat something it reminds me about when I first ate it or who I got the recipe from. When I make recipes from this cookbook I always think about those crazy months I spent in Philadelphia.
Below is one of the recipes from our 'Glitter Girls Cookbook'. We called ourselves the 'Glitter Girls' because the walls of our house were covered in glitter. The guy who did maintenance for our landlord covered the walls of the house in that horrible popcorn stuff that goes on ceilings and then threw glitter (like the silver glitter you used in elementary school for craft projects) up on the wall while the paint was drying. It was horrible and was just one of the many quirks of our house.
I hope to include several more recipes from this cookbook on this blog as well as some of my adventures in Philadelphia.
The cover of our cookbook was a photocopy of our guest placemat. |
We had our dinner guests sign and date the placemat. |
The coveted hot dog recipe. |
Black Bean and Corn Salsa
Source: Glitter Girls Cookbook
Printable Recipe Here
Ingredients:
1 can black beans
1 can corn
2 or 3 green, red or yellow peppers
1 small bunch green onions
1/2 white onion
2 or 3 tomatoes
1/2 bunch cilantro
1/4 cup lime juice
1 teaspoon cumin
1 teaspoon garlic
salt, to taste
Directions:
Empty beans and corn into a large bowl. Chop up peppers, green onions, white onion, tomatoes and cilantro. Add lime juice and spices. Let sit in fridge for a few hours for the flavors to mingle. Serve on chips or over lettuce as a salad.
Amy's Notes:
I love this stuff. I hadn't made it in almost two years so it was long overdue to make! We ate this salsa as dinner because it was so good! I've never done it but I would like to try adding avacado to this next time.
All mixed together and marinate in the fridge for a few hours. |
Seriously. So good. |
Yum |
Wednesday, August 18, 2010
Crock Pot Salsa Chicken and Cilantro Lime Rice
I've been thinking, how do I keep my recipes and cooking notes straight without having to print it all out? I'd been wanting to keep sort of a 'cooking journal' but, again, didn't know how I could do that without spending a lot of time and money printing. Thus, this blog will be my cooking journal. Hopefully, it will also be a great way to share some of my favorite recipes as well as my cooking/baking triumphs and failures. I hope you enjoy!
I love a delicious, easy, and cheap recipe and this is no exception! It's super easy--dump it all in and let it cook all day. Plus, the ingredients are all things I keep around anyway.
Crock Pot Salsa Chicken
adapted from : http://makelifedelicious.com/2009/08/crock-pot-salsa-chicken/
Ingredients:
1 can chicken
1 can corn
1 can black beans, drained
1 jar salsa
Directions:
Combine all ingredients in crock pot and cook on low about 6 hours. Shred chicken with fork. Serve over rice or in torillas as soft tacos. Makes 4-6 servings.
Amy's Notes: I used our small crock pot to cook this dish. It barely fit in the crock pot and overflowed a bit, so I would reccommend a normal size crock pot. I also took the lid off for about an hour or two so the chicken would thicken up a bit.
Cilantro Lime Rice
adapted from: http://annies-eats.com/2010/06/10/cilantro-lime-rice/
Ingredients:
1 cups white rice
2 cups water
1/2 tsp salt
1/2 cup fresh cilantro
2 tbsp fresh lime juice
1 tbsp olive oil
1 clove chopped garlic
Directions:
Combine the rice and 2 cups water in a medium saucepan. Set over medium-high heat. Bring to boil, stir briefly, cover and reduce heat to low. Let cook, covered, until water is absorbed and rice if fluffy and tender, 16-18 mins.
While rice is cooking, combine cilantro, lime juice, olive oil, and garlic in blender or food processor. Blend until smooth. Stif the mixture into cooked rice and fluff with fork.
Amy's Notes:
I must admit, I have no idea how to cook rice over the stove. I always cook my rice in a rice cooker, so I have no advice for cooking rice. Sorry.
I used cilantro I had leftover from another meal that I froze. Also, I am not a fan of my blender, so I chopped the cilantro by hand and mixed it all up with a fork in a bowl.
The finished product:
I love a delicious, easy, and cheap recipe and this is no exception! It's super easy--dump it all in and let it cook all day. Plus, the ingredients are all things I keep around anyway.
Crock Pot Salsa Chicken
adapted from : http://makelifedelicious.com/2009/08/crock-pot-salsa-chicken/
Ingredients:
1 can chicken
1 can corn
1 can black beans, drained
1 jar salsa
Directions:
Combine all ingredients in crock pot and cook on low about 6 hours. Shred chicken with fork. Serve over rice or in torillas as soft tacos. Makes 4-6 servings.
Amy's Notes: I used our small crock pot to cook this dish. It barely fit in the crock pot and overflowed a bit, so I would reccommend a normal size crock pot. I also took the lid off for about an hour or two so the chicken would thicken up a bit.
Crock Pot Salsa Chicken |
Cilantro Lime Rice
adapted from: http://annies-eats.com/2010/06/10/cilantro-lime-rice/
Ingredients:
1 cups white rice
2 cups water
1/2 tsp salt
1/2 cup fresh cilantro
2 tbsp fresh lime juice
1 tbsp olive oil
1 clove chopped garlic
Directions:
Combine the rice and 2 cups water in a medium saucepan. Set over medium-high heat. Bring to boil, stir briefly, cover and reduce heat to low. Let cook, covered, until water is absorbed and rice if fluffy and tender, 16-18 mins.
While rice is cooking, combine cilantro, lime juice, olive oil, and garlic in blender or food processor. Blend until smooth. Stif the mixture into cooked rice and fluff with fork.
Amy's Notes:
I must admit, I have no idea how to cook rice over the stove. I always cook my rice in a rice cooker, so I have no advice for cooking rice. Sorry.
I used cilantro I had leftover from another meal that I froze. Also, I am not a fan of my blender, so I chopped the cilantro by hand and mixed it all up with a fork in a bowl.
Cilantro Mixture |
Cilantro Lime Rice |
The finished product:
And it was delicious. |
Subscribe to:
Posts (Atom)