Background

Monday, January 31, 2011

Valentine's Day Cake Pops

So after I made my Valentine's Day cupcakes, I made Valentine's Day cake pops!  I split my batter between 24 mini-cupcakes in my last post and one large 9 inch round cake that made about 30ish cake pops. 


I had white, pink and red candy coating to use for these cake pops and a variety of Valentine's Day sprinkles to choose from that I've been snatching up at the grocery store when I see them.  I chose to leave the pink ones un-sprinkled for a little contrast.


To form the heart shape, I used a cookie scoop to form a ball, rolled that into a tighter ball with my hand, which I pressed and fit into a small heart shape cookie cutter and then gently pressed out of the cookie cutter.  It's quite a bit of extra work for the heart shape, but Valentine's isn't the same without heart shaped cake pops!


After each heart was dipped, sprinkled and dried, I packed each in a small plastic bag tied with pink ribbon.  I ate one to test, mailed a package of 12 to my family in WA (which arrived very quickly with minimal damage!!) and gave the rest away to people here in town. 


All in all, I was very happy how these little cuties turned out!


Pin It!

Sunday, January 30, 2011

Valentine's Day Cupcakes

I've been having fun with Valentine's Day goodies! 


These babies are chocolate cupcakes with raspberry cream cheese buttercream frosting--a perfect combination for Valentine's Day!


The sweet raspberry frosting pairs well with the rich chocolatey cupcake.


For the frosting, I made my normal frosting recipe, but added about 5 tablespoons of raspberry puree plus additional powdered sugar to thicken up the frosting for piping. 


I made 24 mini-cupcakes with this cake plus one large 9 inch round cake for cake pops, which I will post next!


Pin It!

Saturday, January 22, 2011

Red Velvet Whoopie Pies

Whoopie pies are the new cupcakes!  What's a whoopie pie, you ask?  It's two cakey cookies with frosting in between them, kind of like a moon pie.  They are yummy, easy to pop into a lunch bag, and pretty easy to make.  These would be perfect for a Valentine's day treat!

Red Velvet Whoopie Pies
Source: Bakerella
Printable Recipe

Ingredients:
Cookies:
1 box German Chocolate cake mix
1/2 cup butter, softened
2 eggs
1 (1 ounce) red food color
1 tablespoon unsweetened baking cocoa
Cream Cheese Filling:
1/4 cup butter, softened
4 ounces cream cheese, softened
1/2 teaspoon vanilla
2 cups powdered sugar

Directions:
Heat oven to 350 degrees.  Spray cookie sheets generously with cooking spray (or use parchment paper).
In medium bowl, beat all cookie ingredients with electric mixer on medium speed until blended.  Onto cookie sheet, drop batter by rounded tablespoons about 2 inches apart.
Bake 11 to 13 minutes or until set.  Cool 2 minutes before removing to cooling rack; cool completely.
In medium bowl, beat butter, the cream cheese and vanilla with electric mixer until blended.  Gradually, add powdered sugar, 1 cup at a time, beating on low speed until smooth.  For each sandwich cookie, spread 1 generous tablespoon of filling on bottom of 1 cookie.  Top with second cookie, bottom side down; gently press together.  Store covered in refrigerator.

Amy's Notes:
The last (and only) time I made whoopie pies, they were quite....fluffy.  This time I sprayed a little non-stick spray on the back of a spoon and pressed down the batter before putting them into the oven.  They baked out very nicely into a good consistent shape, thanks to my cookie scoop.  I also used a piping bag to dispense the frosting evenly, but you definitely could just use a knife to spread it.  I think these are perfect for Valentine's day--I've seen mixes being sold in stores!  And you could even cut them into heart shapes!


Pin It!

Friday, January 21, 2011

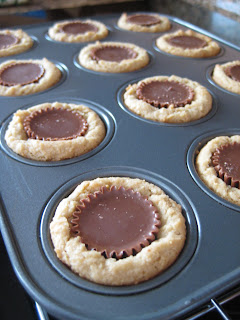
Peanut Butter Cup Cookies

I stumbled upon the recipe several years ago while looking for a new cookie recipe to make for a work Christmas party.  That year, I made several batches but haven't made them for at least two years.  I whipped up a batch of these to take along when we went to visit my parents over Christmas.  There is nothing particularly 'Christmas-y' about these cookies, yet I always seem to need them during Christmas time.  Trust me, this recipe is a keeper!

Peanut Butter Cup Cookies
Source: allrecipes.com
Printable Recipe

Ingredients:
1 3/4 cups all-purpose flour
1/2 teaspoon salt
1 teaspoon baking soda
1/2 cup butter, softened
1/2 cup white sugar
1/2 cup peanut butter
1/2 cup packed brown sugar
1 egg, beaten
1 teaspoon vanilla extract
2 tablespoons milk
40 miniature covered peanut butter cups, unwrapped (Reese's)

Directions:
Preheat oven to 375 degrees
Sift together the flour, salt and baking soda; set aside
Cream together the butter, sugar, peanut butter and brown sugar until fluffy.  Beat in the egg, vanilla, and milk.  Add the flour mixture, mix well.
Shape into 40 balls, either by hand or with a cookie scoop, and place each into an ungreased mini muffin pan.
Bake for about 8 minutes.  Remove from oven and immediately press a mini peanut butter cup into each ball.  Cool and carefully remove from pan. 

Amy's Notes:
These are a little tricky to make, but totally worth the effort.  Here are the things I've learned.  Always make sure to unwrap the peanut butter cups before the time come to put them into the cookies.  I say this because the first time I made them I thought I could just unwrap them as I went, but trust me, you just can't unwrap them fast enough when you need to.  Also, after the peanut butter cups are in the cookies, I usually pop the whole pan into the freezer for a few minutes to solidify the melted peanut butter cup.  It also helps to get the cookies out of the mini-muffin tin without mangling them. 


Pin It!

Thursday, January 20, 2011

Enchilada Grande Casserole

I love Mexican food--both authentic and American.  This is definately not authentic but still good.  It's a very easy recipe to make and pretty quick also.  It's not the most glamerous of meals, but casseroles never are!

Enchilada Grande Casserole
Printable Recipe

Ingredients:
1 pound ground beef
1 16 ounce can refried beans
1 15 ounce can no-salt added tomato sauce
1/2 cup water
1 envelope enchilada sauce mix
8 7-8 inch flour tortillas
2 cups shredded cheddar cheese

Directions:
Preheat oven to 350 degrees.  In large skillet, cook ground beef until brown.  Drain off fat.  Stir in beans, tomato sauce, water and enchilada mix.  Bring to boil, reduce heat, and let simmer uncovered for 15 minutes, stirring occasionally. 
Arrange half of the tortillas in bottom of a greased 3 quart rectangular baking dish, trimming and overlapping as necessary to fit.  Top with half of the meat mixture and half of the cheddar cheese.  Repeat with remaining tortillas and remaining meat mixture.
Bake for 20 minutes.  Sprinkle with remaining cheese.  Bake about 10 minutes more until heated through.  Let stand 10 minutes.  Serve with sour cream or guacamole.

Amy's Notes:
From beginning to end, this recipe take me about 1 hour to make--including baking time.  I serve it with corn, because I like to mix it in when I eat it, tortilla chips, and any combination of salsa, guacamole and sour cream. 


Pin It!

Thursday, January 6, 2011

Three Cupcakes for the New Year!

It's a new year!!!  Thank God.  Good riddance 2010, welcome 2011, full of possibilities and hope!  I also just turned 27 at the end of December.  I think about where I thought my life would be when I was 27 and this is not it.  I am unemployed (as is my husband), I am living in my in-laws attic, and besides our cars and the objects in our rented storage unit, I have little to my name.  Despite how depressing these things can be, I have hope for better things and happiness to come in this new year. 

One of the beneficial things of the past year has been my new found baking obsession.  It is a coping mechanism, a creative outlet, and a happy place for me to be when things aren't going my way.  I've found I love making cupcakes!  Cupcakes bring a smile to my face as well as to the faces of those who eat them.  My husband and I were recently visiting my family is Washington state and because we don't live close to them, I wanted to make a few cupcakes for them to enjoy while I was home.  So I made cupcakes to end 2010 and to begin 2011. 

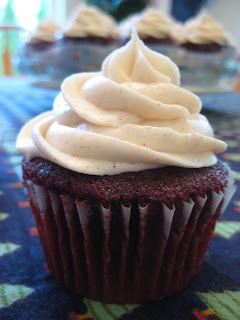
First was a new red velvet cupcake recipe.  It turned out to be a great recipe.  And because of that, I have to keep the recipe to myself.  Sorry friends, a baker has to keep some secrets to herself sometimes!  I made 28 of these cupcakes and my brother at 15 of them himself, all in about 30 hours.  I guess that meant he liked them!

Red velvet cupcakes with cinnamon frosting


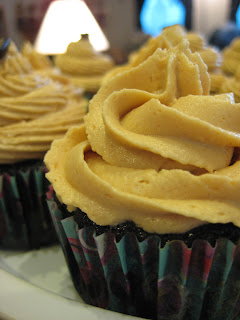
Next, for New Years Eve, my good friend and I made chocolate cupcakes, half with peanut butter frosting and half with espresso frosting.  The peanut butter frosting recipe is already posted here: Peanut Butter Cup Cupcakes and sadly, the espresso frosting wasn't as good as I had hoped.  So the search is on for a good coffee/espresso frosting recipe!
Chocolate cupcake with peanut butter frosting

Chocolate cupcake with espresso frosting


So Happy New Year to each one of you!  May your year be filled with joy, love and lots of cupcakes!

Pin It!